


 导入 OpenTelemetry 数据
#1. 数据流
通过 otel-collector 发送至 deepflow-agent:
直接发送至 deepflow-agent:
#2. 配置 OpenTelemetry
我们推荐使用 agent 模式的 otel-collector 向 deepflow-agent 发送 trace 数据,以避免数据跨 K8s 节点传输。 当然使用 gateway 模式的 otel-collector 也是完全可行的。以下的文档中以 otel-agent 为例介绍部署和配置方法。
#2.1 安装 otel-agent
查看 OpenTelemetry 文档 (opens new window) 可了解相关背景知识。
如果你的环境中还没有 OpenTelemetry,可以使用如下命令在 open-telemetry 命名空间中快速部署一个 otel-agent DaesmonSet:
kubectl apply -n open-telemetry -f https://raw.githubusercontent.com/deepflowio/deepflow-demo/main/open-telemetry/open-telemetry.yaml
安装完毕之后,可以在环境里看到这样一个组件清单:
kubectl get all -n open-telemetry
| Type | Component |
|---|---|
| Daemonset | otel-agent |
| Service | otel-agent |
| ConfigMap | otel-agent |
如果你需要使用其他版本或更新的 opentelemetry-collector-contrib, 请在 otel-docker (opens new window) 仓库中, 找到你想要的镜像版本,然后使用如下命令更新镜像:
LATEST_TAG="xxx"  # FIXME

kubectl set image -n open-telemetry daemonset/otel-agent otel-agent=otel/opentelemetry-collector-contrib:${LATEST_TAG}
2
3
#2.2 配置 otel-agent
我们需要配置 otel-agent ConfigMap 中的 otel-agent-config.exporters.otlphttp,将 trace 发送至 DeepFlow。首先查询当前配置:
kubectl get cm -n open-telemetry otel-agent-conf -o custom-columns=DATA:.data | \
    grep -A 5 otlphttp:
2
deepflow-agent 使用 ClusterIP Service 接收 trace,将 otel-agent 的配置进行修改:
otlphttp:
  traces_endpoint: 'http://deepflow-agent.deepflow/api/v1/otel/trace'
  tls:
    insecure: true
  retry_on_failure:
    enabled: true
2
3
4
5
6
同时,为了确保 Span 发送侧的 IP 传递到 DeepFlow 中,需要增加如下配置:
processors:
  k8sattributes:
  resource:
    attributes:
      - key: app.host.ip
        from_attribute: k8s.pod.ip
        action: insert
2
3
4
5
6
7
但仍需注意,对 K8S 环境而言,需要确保提供的 k8s.pod.ip 能正确对应上 K8S Pod IP,否则 DeepFlow 收集 OTel 标签时没法正确关联到 K8S Pod 上。
最后,在 service.pipeline 中,对 traces 一节增加:
service:
  pipelines:
    traces:
      processors: [k8sattributes, resource] # 确保 k8sattributes processor 先被处理
      exporters: [otlphttp]
2
3
4
5
额外的,如果 otel-agent 接收数据不是应用 Pod 到 otel-agent 直连,而是中间经过了 LB 或者 otel-agent Service 使用 NodePort,再发送 Span 数据等等“中间过了一层网元”的场景,使得最终 k8sattributes 找到的上游 k8s.pod.ip 与应用的 Pod IP 无法匹配,可以尝试通过如下方式来发现真实 Pod IP:
processors:
  resource/pre:
    attributes:
    - key: k8s.pod.name
      from_attribute: host.name
      action: insert
  k8sattributes:
    auth_type: "serviceAccount"
    extract:
      metadata:
      - k8s.pod.name
      - k8s.pod.uid
      - k8s.pod.ip
    passthrough: false
    pod_association:
    - sources:
      - from: resource_attribute
        name: k8s.pod.name
    - sources:
      - from: resource_attribute
        name: k8s.pod.ip
    - sources:
      - from: resource_attribute
        name: k8s.pod.uid
    - sources:
      - from: connection
  resource/post:
    attributes:
    - key: app.host.ip
      from_attribute: k8s.pod.ip
      action: insert
service:
  pipelines:
    traces:
      processors:
      - resource/pre
      - k8sattributes
      - resource/post
2
3
4
5
6
7
8
9
10
11
12
13
14
15
16
17
18
19
20
21
22
23
24
25
26
27
28
29
30
31
32
33
34
35
36
37
38
解释一下这个配置的含义:在流水线里,先通过 resource/pre 来发现 host.name,并把它设置为 k8s.pod.name,然后通过 k8sattributes 的 pod_association 配置关联上 K8s Pod 元信息,然后,通过 k8sattributes 的 extract 模块提取 k8s.pod.ip,最后,在 resource/post 模块中,把它修改为 app.host.ip attribute,并发送到 deepflow-agent。
可以注意到,在这个过程中,真正实现了服务发现其实是 host.name 标签,这个 attribute 来源于 Span 数据源。实际上,它一般是由 OTel Sdk 或 OTel Agent 自动生成的,当然,你也可以通过 K8s Downward API (opens new window) 获取到 Pod 运行的 Pod IP 或者 Pod Name,并注入到实际发送的 Span 中。其中,pod_association 的 name 属性会尝试匹配 Pod 的元数据进行关联,并找到对应的 Pod。
可以发现,这里给的示例是通过 k8s.pod.name 尝试匹配,如果有其他 attribute 通过同样的方法注入,同样可以找到目标 Pod,目前已知支持的 attribute 可以在 Otel K8sAttributesProcessor 模块 (opens new window) 中找到。
#3. 配置 DeepFlow
接下来我们需要开启 deepflow-agent 的数据接收服务。
首先我们确定 deepflow-agent 所在的采集器组 ID,一般为名为 default 的组的 ID:
deepflow-ctl agent-group list
确认该采集器组是否已经有了配置:
deepflow-ctl agent-group-config list
若已有配置,将其导出至 yaml 文件中便于进行修改:
deepflow-ctl agent-group-config list <your-agent-group-id> -o yaml > your-agent-group-config.yaml
修改 yaml 文件,确认包含如下配置项:
vtap_group_id: <your-agent-group-id>
external_agent_http_proxy_enabled: 1   # required
external_agent_http_proxy_port: 38086  # optional, default 38086
2
3
更新采集器组的配置:
deepflow-ctl agent-group-config update <your-agent-group-id> -f your-agent-group-config.yaml
如果采集器组还没有配置,可使用如下命令基于 your-agent-group-config.yaml 文件新建配置:
deepflow-ctl agent-group-config create -f your-agent-group-config.yaml
#4. 基于 Spring Boot Demo 体验
#4.1 部署 Demo
此 Demo 来源于 这个 GitHub 仓库 (opens new window),这是一个基于 Spring Boot 编写的由五个微服务组成的 WebShop 应用,其架构如下:
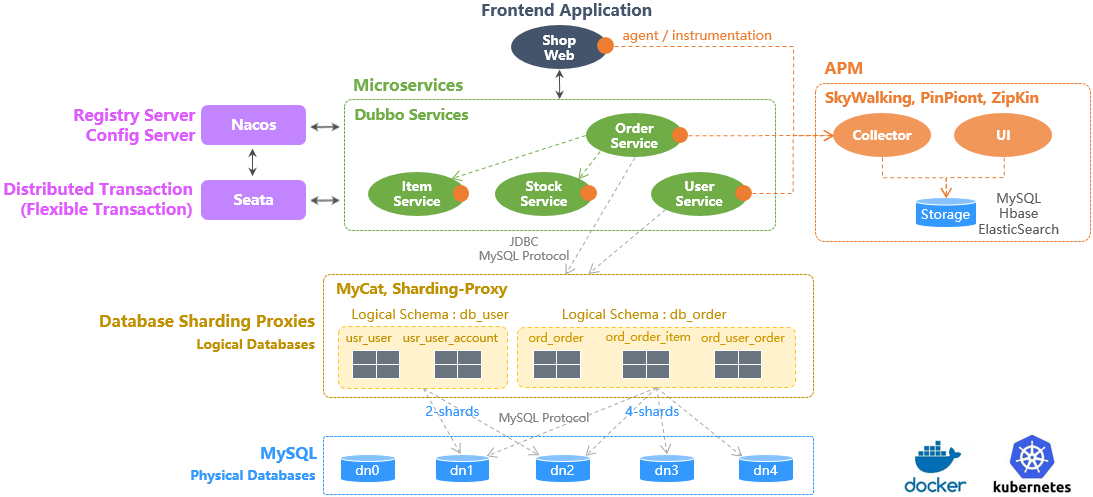
Sping Boot Demo Architecture
使用如下命令可以一键部署这个 Demo:
kubectl apply -n deepflow-otel-spring-demo -f https://raw.githubusercontent.com/deepflowio/deepflow-demo/main/DeepFlow-Otel-Spring-Demo/deepflow-otel-spring-demo.yaml
#4.2 查看追踪数据
前往 Grafana,打开 Distributed Tracing Dashboard,选择 namespace = deepflow-otel-spring-demo 后,可选择一个调用进行追踪。
DeepFlow 能够将 OpenTelemetry、eBPF、BPF 获取到的追踪数据关联展示在一个 Trace 火焰图中,
覆盖一个 Spring Boot 应用从业务代码、系统函数、网络接口的全栈调用路径,实现真正的全链路分布式追踪,效果如下:

OTel Spring Demo
你也可以访问 DeepFlow Online Demo (opens new window) 查看效果。
对这个追踪 Demo 我们总结一下:
- 全链路:集成 OTel、eBPF 和 BPF,自动追踪到了这个 Trace 的 100 个 Span,含 20 个 eBPF Span、34 个 BPF Span
- 全链路:对 OTel 无插码的服务,支持通过 eBPF 自动追踪补齐,例如 Span 1-6(loadgenerator)等
- 全链路:对 OTel 无法插码的服务,支持通过 eBPF 自动追踪补齐,例如 Span 67、100 的 eBPF Span 描绘出了 MySQL Transaction 的开始和结束(SET autocommit、commit)
- 全栈:支持追踪同 K8s Node 上两个 Pod 之间的网络路径,例如 Span 91-92 等
- 全栈:支持追踪跨 K8s Node 上两个 Pod 之间的网络路径,即使中间经过了隧道封装,例如 Span 2-5 等(IPIP 隧道封装)
- 全栈:eBPF 和 BPF Span 穿插在 OTel Span 之间,打通应用、系统和网络,例如 eBPF Span 12、27、41、53 与它们的父 Span(OTel)的显著时差可用于确定真实的性能瓶颈,避免上下游应用开发团队的迷惑
#5. 基于 OpenTelemetry WebStore Demo 体验
#5.1 部署 Demo
此 Demo 来源于 opentelemetry-webstore-demo (opens new window), 这个 Demo 由 Go、C#、Node.js、Python、Java 等语言实现的十多个微服务组成,它的应用架构如下:
使用如下命令可以一键部署这个 Demo:
kubectl apply -n deepflow-otel-grpc-demo -f https://raw.githubusercontent.com/deepflowio/deepflow-demo/main/DeepFlow-Otel-Grpc-Demo/deepflow-otel-grpc-demo.yaml
#5.2 查看追踪数据
前往 Grafana,打开 Distributed Tracing Dashboard,选择 namespace = deepflow-otel-grpc-demo 后,可选择一个调用进行追踪。
DeepFlow 能够将 OpenTelemetry、eBPF、BPF 获取到的追踪数据关联展示在一个 Trace 火焰图中,
覆盖一个多语言应用从业务代码、系统函数、网络接口的全栈调用路径,实现真正的全链路分布式追踪,效果如下:

OTel gRPC Demo
你也可以访问 DeepFlow Online Demo (opens new window) 查看效果。